The story behind _references.js
 The _references.js file controls a key part of the JavaScript Intellisense in Visual Studio for web projects and can mean the difference between awesome Intellisense and none at all.
This is the story of how it works and why it even exist.
A new JavaScript editor
The story begins shortly after the release of Visual Studio 2010. The ASP.NET & Web Tooling Team (the team I'm part of) was handing over the ownership of the JavaScript editor to a newly formed Client Platform team.
This team was going to create a completely new and modern JavaScript editor for Visual Studio 2012 – one that was aligned with the efforts around delivering the tooling experience for the upcoming HTML/JavaScript based Windows 8 Store apps.
The now old JavaScript editor was retired from Visual Studio, but found new life in WebMatrix, where it received further development and updates.
As the work progressed with the new editor, it was time to redesign some of the many features we've all gotten accustomed to. One of them was Intellisense.
Three types of Intellisense
There are several ways of implementing Intellisense for JavaScript. The three I remember being discussed were:
- All .js files in the project are automatically included in Intellisense
- Only .js files included on the same HTML pages are included
- The user can manually reference other .js files
By including all .js files in Intellisense means that there is potential for a lot of false positives. By that I mean that you'll get Intellisense coming from .js files that are not loaded on the same page as the .js file you're currently editing. It's sort of the same as getting C# Intellisense for types that hasn't been imported with a using statement – it would break at runtime.
Loading all .js files automatically in Intellisense also came with additional issues. One was performance. The more files to parse, the heavier Intellisense became and it could hurt the user experience. Another was ordering of the .js files. The new editor runs all the code, so correct ordering of when to run each .js file was an important factor for accuracy.
However, bundling, minification and dynamically loaded JavaScript would make it impossible for any IDE to statically figure out what .js files to provide Intellisense for. The result could potentially be that no Intellisense from other .js files got loaded at all, which was arguably worse than loading too much Intellisense.
Finally, letting the user manually add references to other .js files eliminates performance issues and the parsing of HTML files to follow <script> references. For ASPX files that also meant following references to master pages to find <script> references. The problem with relying on the user to add references is that it puts the burden on the user.
So there were pros and cons to each approach.
Explicit and implicit references
It was decided that the new editor should use a combination of option 2 and 3. It both follows <script> references and allows the user to manually add an explicit triple-slash references. Triple-slash references look like this and can be added to the top of any .js file:
/// <reference path="../app/respond.js" />
Dragging a .js file from Solution Explorer onto an open .js document will automatically insert a triple-slash reference at the top of the document. By adding this reference, Visual Studio will now always include Intellisense coming from the referenced file, regardless of any other conditions.
_references.js is global
The issue with explicitly referencing other .js files is that you'll end up adding reference to jQuery more or less on all your .js files. That's not cool. It was important to keep the burden on the user at a minimum, so a global reference cache was needed.
Enter _references.js.
This file must (by default) be located in a folder at the root called /scripts/. That's the naming convention. Any file located at /scripts/_references.js is automatically added to global Intellisense. This is now the only file we need for triple-slash references. Here's what the contents of this file may look like:
/// <reference path="modernizr-2.6.2.js" />
/// <reference path="jquery-1.10.2.js" />
/// <reference path="bootstrap.js" />
/// <reference path="respond.js" />
Just a bunch of references. This is also the only file that is included in Intellisense by default at all times.
The cool thing is that the user now only have to control Intellisense in one central location. Burden minimized.
Change naming convention
Some people don't like to use a folder named /scripts/ or the name _references.js. That's perfectly fine and Visual Studio offers a way out.
Let's imaging that someone prefers the global reference file to be located at /js/globals.js – not just for one project, but in general.
Get to the Quick Launch box by hitting CTRL+Q. Then type javascript ref and select this option in the dropdown:

In the settings window that pops up, select Implicit (Web) in the dropdown:
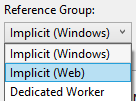
Implicit (Windows) is for Windows Store apps and has no effect on web projects. The same is true vice versa.
At the bottom of the list, you can see that there is a reference to /Scripts/references.js:
![]()
So now you can see what the path syntax looks like and you can therefore easily add a new path ~/js/globals.js. You can add as many as you'd like. If the file doesn't exist, Visual Studio will just ignore it.
A tilde followed by a forward slash (~/) is referred to as tilde-slash and marks the root of a website.
Automating it all
All this shipped with Visual Studio 2012, but when it was time to focus on Visual Studio 2013, we decided that this workflow should be improved.
It wasn't ok that developers should maintain this file manually. JavaScript files are added, deleted and renamed all the time, so it's very easy to forget to update the _references.js file accordingly.
A better approach was to add a feature that would do that automatically and thereby give Intellisense for all .js files globally all the time. However, we knew that both performance and file ordering could be an issue, so it was important that this feature could be disabled in case of trouble.
We didn't want a setting, since Visual Studio doesn't have per-project settings. And this was indeed a per-project challenge. So we introduced a new triple-slash concept – auto-sync.
It looks like this and is located at the very top of _references.js:
/// <autosync enabled="true" />
This new auto-sync comment is all it takes to enable automatic synchronization of triple-slash references. Whenever a .js file is added, renamed, moved or deleted, the _references.js file is automatically updated to reflect the changes.
Right-clicking on the _references.js file in Solution Explorer now gives you two new options:
![]()
The first is the Auto-sync JavaScript References. Clicking this menu item adds the auto-sync comment so you don't have to type it manually. It's convenient, discoverable and you only have to set it once per project.
The second menu item is Update JavaScript References. This will add all .js files in the project as triple-slash references in the _references.js file. It updates only once and it doesn't enable auto-sync.
With these two new commands, you can now decide if you want auto-sync or if you prefer to just update the references whenever you are in the mood.
One caveat to enabling auto-sync of _references.js is that the references are potentially ordered in the wrong way. It could cause issues, but it probably won't. Personally, I haven't had any issues and I've used this in many projects now. But just in case it does cause trouble, now you know how to turn it off.
So with Visual Studio 2013 we end up having all three approaches to JavaScript Intellisense.
Generate a _references.js file
If you don't have a _reference.js file in your project, but you have Web Essentials 2013 installed, then it's really easy to add one. Simply right-click the /Scripts/ folder and go to the Add submenu to find an easy way to add references.js.
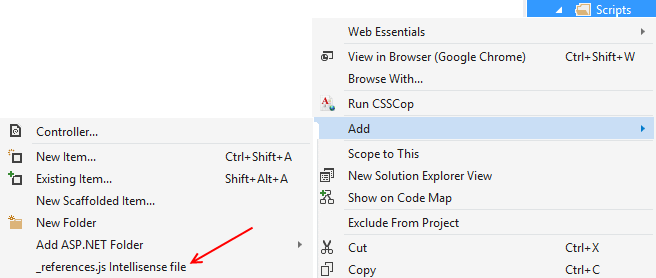
An added benefit with this approach is that the new _reference.js file has auto-sync enabled already.
So, that was the story of _references.js and how it came to be. There are always room for improvements, so our job is never done. The work continues…
