Today I hit the all time record of comment spam with a staggering 367 attacks in just 21 minutes. They were all coming from the same IP address but with various different comments that all had something to do with selling Christmas cards. I don’t mind the occasional comment spam attacks since none get through, but when they hit as hard as they did today I get annoyed because they take up CPU cycles and bandwidth.

I needed a way to block these pesky intruders from leeching on my server and hopefully find a way to keep them from returning.

BlogEngine.NET 1.3 to the rescue

The next version of BlogEngine.NET with the creative title of 1.3, which is due before Christmas, has some new events exposed for extension builders. One of them is called Comment.SpamAttack and gets raised every time a spammer tries to add a comment.

So I wrote a small extension that listens to that event and collects IP addresses from the clients making the spam requests. When the same IP address gets caught spamming comments 3 times, the extension clears the response and sends back a 404 HTTP header. The reason for that is to trick the spammer (which almost always is a dumb robot) to believe that the URL doesn’t exist and therefore it would stop trying and wont come back.

This extension is only a few hours old so I don’t have any statistics on its effect yet, but my spider sense tells me it will have positive effect in fighting the spam attacks right now and in the long term.

You can also create extensions that listens to the Comment.AddingComment which is raised before the comment is saved. That gives you the possibility to do your own spam filtering, because you can then cancel saving the comment and raise the Comment.SpamAttack event by calling the static Comment.OnSpamAttack() method.

I’ll test the extension thoroughly and if it behaves well, it will be included in the 1.3 release. You can also get a sneak peak at the extension by downloading the .cs file below:
BlackLister.zip (886 bytes)

As you may have noticed already, I’ve added an image to the top of every blog post saying Listen now. When you click it, a nice little flash player appears and you’ll now hear the blog post being narrated by some dude. It’s a computer generated mp3 and I’m very impressed with the quality. I’ve also added a podcast as a second RSS feed with all the mp3’s attached to each post.

I have no idea if this is something people want to use, but I think it is very cool. And guess what, it’s a free service provided by Odiogo that anyone can use. It works by reading your RSS feed and creating an mp3 file from each post.

Set it up

First of all you have to sign up with Odiogo for a free account. Then you wait 6½ hour for your account to be created and the first mp3’s created. That’s it, now you have a special podcast feed served by Odiogo. Check out mine.

That’s the first step. Second step is to add the image button on each post. Odiogo have created some plug-ins for Wordpress, Blogger, MovableType and Terapad you can use and I have created an extension for BlogEngine.NET 1.2. Download it at the bottom of this post.

Ping service

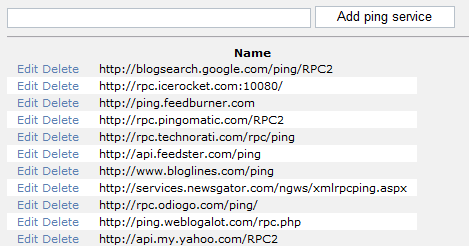
Optionally, you can take advantage of Odiogo’s ping service that let’s your blog software ping Odiogo’s servers when you create a new post. Then they’ll automatically create the mp3 file right away instead of waiting for them to crawl your blog. In BlogEngine.NET you have to open the PingServices page in the admin section and add this service address: http://rpc.odiogo.com/ping/. Remember that the blog post need to be converted to an mp3 and that takes a little while. I don’t know how long yet, but there will be a gap from when you publish a post to the mp3 is available.

Podcast feed link 

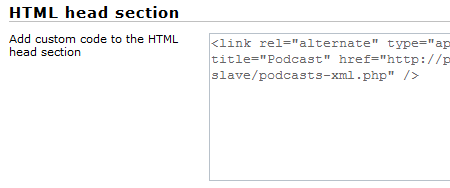
You can also add a reference to the podcast feed in your page’s header by adding a link tag. In BlogEngine.NET you must navigate to the settings page in the admin and paste a link tag with your podcast URL in the href attribute like so: 

<link rel="alternate" type="application/rss+xml" title="Podcast" href="http://podcasts.odiogo.com/-net-slave/podcasts-xml.php" />

Change the part in bold to your own feed URL.

Download BlogEngine.NET extension

The extension will add the image button on top of your posts and surround it with a div that has a class called odiogo so you can control it through CSS. The extension also shows you how to manipulate the controls on any page and not just the rendered output of posts and comments. All you need to do is to open the extension file and change the FeedID variable to the one you recieve in the activation e-mail from Odiogo. You'll find it in the subject of that mail and it is an integer.

Download Odiogo.zip (1.13 kb)