Are you using tabs or spaces to indent your markup? Does it matter for performance which one you chose? Let’s run an experiment.

Consider a page that generates a list of 50 items:

<ul>
    @for (int i = 0; i < 50; i++)
    {
        <li>The count is @i</li>
    }
</ul>

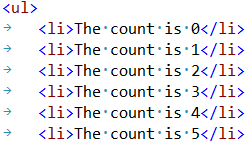
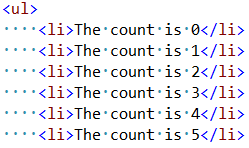
The code generates a long list of <li> elements and keep their indentation using the editor’s settings for tabs, spaces and tab size. Default in many editors is spaces and a tab size of 4.

With spaces it looks like this:
image

and with tabs it looks like this:

image

It’s clear to see that the indentation takes up 4 characters when spaces are used and only a single character when using tabs. If we then compare the total file size of the two variations, here’s what we get:

TabsSpacesSaving
Raw file size1403 bytes1703 bytes300 bytes/18%

Using tabs saves close to 18% of the file size over spaces.

This is, however, not a true picture of a web page. All modern web servers use compression in form of GZip or Deflate before serving HTML to the browser. So let’s look at the numbers after GZip:

TabsSpacesSaving
Raw file size1403 bytes1703 bytes300 bytes/18%
Raw file GZipped   327 bytes   332 bytes     5 bytes/1.5%

When using GZipping, the saving from using tabs over spaces is just 1.5%. It’s still a saving and it counts.

Yet again, this is not the complete story because some web developers make sure to minify the HTML by removing redundant whitespace, unneeded quotation marks etc. Normally this is done as a build step or at runtime.

So let’s minify the HTML and see what results it produces:

TabsSpacesSaving
Raw file size1403 bytes1703 bytes300 bytes/18%
Raw file GZipped  327 bytes  332 bytes     5 bytes/1.5%
Raw file minified 1199 bytes1199 bytes     0 bytes/0%
Minified & GZipped  312 bytes  312 bytes     0 bytes/0%

When minified, it doesn’t matter if tabs or spaces are used, since they are all stripped away.

Conclusion

Depending on the capabilities of your server, build setup, runtime etc., here’s a little chart of what to do based on the above findings:

Use tabs or spaces
I can minifyDoesn't matter at all
I can GZip but not minifyDoesn’t matter much (tabs gives small benefit)
I can neither GZip nor minifyTabs

Keep in mind that this is a controlled experiment, so your mileage will vary.

If you want to enforce your entire team to use either tabs or spaces, then take a look at .editorconfig. There’s a plugin available for practically all editors.

In the next segment, we look at the effects of GZipping vs. minifying HTML files.
So you have a website filled with images, CSS and JavaScript files, and you realize that you haven’t bothered optimizing the images or minified the CSS and JavaScript files. Or maybe you have, but your users can upload their own and they don’t get optimized/minified.

What’s the easiest way to go about that? Well, you could use tools like Web Essentials and PngGauntlet to help out, but that doesn’t solve the issue with user-uploaded files. You probably have to modify your website to include *.min.js files, commit them to source control, modify your website project and so on.

It would be much nicer if we didn’t have to worry about any of this and didn’t have to make any modifications to our website. It would be much nicer if it just happened automatically.

With Azure Websites that is now possible. Any web application hosted on Azure Websites no longer have to bother with these types of optimizations anymore.

It doesn’t matter if your website is running ASP.NET, PHP, Node.js or plain static HTML, it works for them all.

All there is needed is to install a NuGet package and publish the website to Azure. Here’s a video demonstrating how to add automatic image optimization.

The video shows how simple it really is to optimize images. To optimize CSS and JavaScript files, we can do the exact same thing, but with a different NuGet package.

Here’s what we need:

  1. Install NuGet package: Azure Image Optimizer
  2. Install NuGet package: Azure Minifier
  3. On a web application hosted on Azure Websites

How it works

Both the Image Optimizer and the CSS/JavaScript Minifier works the same way.

When they are installed and you publish to Azure Websites, an MSBuild trick makes sure to publish the Webjobs with your web application. As soon as that is done, Azure recognizes the Webjobs and starts them up.

The first time they start up, it can take a little while for them to finish the first pass of optimizations if you have a lot of files to optimize. You might even see the Webjobs restarting in the Azure portal. That’s ok, no problem. They start up immediately again and continues on where they left off.

The Image Optimizer supports .png, .gif and .jpg files. And the Minifier supports .js and .css files.

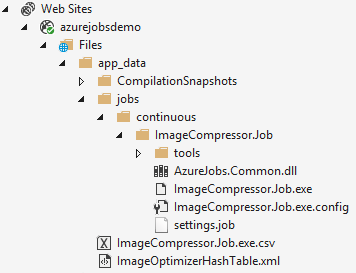
Server Explorer in Visual Studio shows us the Webjobs along with a log file and a cache file.

image

The log file is being written to every time a file has been optimized. You can open it by double clicking directly on the .csv file in Server Explorer. The cool thing about using a .csv file is that it an be opened in Excel, so you can easily do more calculations on the data.

The cache file (.xml) contains a list of files and their MD5 hash values. That ensures that the same files aren’t being optimized over and over again each time you publish or restart the WebJob.

If you have enabled Streaming Logs, then you can see the optimizations happen in real time directly within Visual Studio’s Output Window as well.

Open Source

As always, we keep our source code on GitHub and of course accept pull requests.

These features have been some that both Sayed and I have been wanting to add for a long time, but it was never possible before Microsoft introduced Azure Webjobs, because they required continuously running background tasks to work most reliably and in a way that scales.

The demo website used in the video is also open source and is great for playing around with these two optimizers yourself.

Happy optimizing!